How to Create a Name Badge Template in Word (Free Templates + Easy Guide)
*Updated on 27 June 2025*

We’ve all been there. The event is days away, the guest list is finally final, and “sort out name badges” is sitting at the top of your to-do list. The last thing you need is a battle with complicated design software.
Good news: Creating a name badge template in Word is faster than you might think — and doesn’t require design software. If you’re searching for an easy name badge template in Word, this guide shows you exactly how to create professional event badges in minutes – you’ll find the easiest way to create name badges in Word, plus a free Word name badge template you can download instantly.
Whether you’re an executive assistant prepping for a major conference or an office manager arranging a workshop, Microsoft Word is a surprisingly powerful tool for creating professional, personalised name tags.
This guide is your complete playbook. We’ll walk you through everything about how to create a name badge template in Word, step-by-step, from setup to printing, and share pro secrets to make your badges look like they were designed by an agency.
- Choose your size: A7 (74x105mm) is standard and compact. A6 (105x148mm) offers more room for logos and content when building your name badge template in Word.
- Set up your name badge template in Word: Go to Mailings > Labels > New Label to create a custom badge size. Or insert a table and manually set the cell dimensions. (Our tip The Labels feature is faster.)
- Design for clarity: Use a big, bold, sans serif font such as Arial or Open Sans for first names. Make it readable from three metres away.
- Automate with Mail Merge: Use Mailings > Start Mail Merge to connect an Excel guest list and avoid typing hundreds of names manually.
- Download our resources: Skip the setup and grab our free templates including a Word name badge template free.
If you’d prefer to skip designing a name badge template in Word, we offer beautiful sustainable, custom print options.
Grows into plants. Beautiful and waste free.
Sustainable, crisp and perfect for corporate events.
Step 1: Choose the Perfect Badge Size (A6 vs A7)
First, decide on the size that fits your event’s needs. In Australia, A6 and A7 are the most popular choices for a reason.
-
A7 (74 x 105 mm): The Compact Professional
This is the standard, passport-esque size. It’s perfect for most corporate events where you need aa badge to be clear but not bulky. It feels unobtrusive. -
A6 (105 x 148 mm): The Creative Powerhouse
At roughly postcard size, A6 gives your content breathing room. It’s the ideal choice if you have bold creative, long names, multiple logos, a QR code, or even a mini-agenda on the badge.
Our advice? If you’re unsure, start with A7. If the design feels cramped, size up to A6.
For orientation, Portrait (vertical) is great for stacking info (Name, Title, Company), while Landscape (horizontal) works well for wide logos. There’s no wrong choice. It comes down to your design. Once you know your size and orientation, you’re ready to set up the template.
Helpful resources to make your name badges look brilliant
If you want a head start, here are our most-loved tools and guides. They save you time, avoid formatting headaches and help you create badges that look professional in Word, PowerPoint or Canva.
-
Free templates
Download A6 and A7 badge templates for Word, PowerPoint and Canva. Download here -
Merging your guest list in minutes
A step-by-step guide to creating hundreds of badges fast using Word Mail Merge. Read the guide -
Designing badges in Canva
Make Canva work for you with layouts that stay aligned and readable. See how -
The name badge design bible
Everything you need to avoid bad layouts, tiny fonts and awkward sponsor placement. Read the design bible -
2025 Name Tag Lookbook
Real examples, creative layouts and style ideas for any event type. Browse the lookbook
Step 2: Set Up Your Name Badge Template in Word

Before you start designing, it helps to understand how a name badge template in Word is structured. There are two ways to build your template in Word. Here’s a quick guide to help you choose the best method for you.
| Method | Best For… | Pros | Cons |
|---|---|---|---|
| Using Word’s Labels Feature | Precision and speed for standard layouts. | Quick, precise, Word does the math for you. | Less flexible for unusual layouts. |
| Using a Manual Table | Full control and custom layouts. | Infinitely customisable. | Takes a few more clicks to set up. |
Method 1 Using Word’s Labels Feature (Recommended)
-
Open Word and navigate to the Mailings tab.
-
Click Labels. In the pop up window, click the Options button.
-
Click New Label. This is where the magic happens.
-
Define your badge:
Give it a name such as A7 Event Badge.
Enter the dimensions for your badge. A7 is seventy four millimetres by one hundred and five millimetres. A6 is one hundred and five by one hundred and forty eight.
Set the page margins and the number of labels per row and column. For example, set Number across to two and Number down to one to fit two A6 badges on an A4 page.
Click OK.
-
Back in the main window, click New Document. Word will instantly create a new document with a perfectly sized table ready for your design.
-
Duplicate for more badges: If you need more than the default number, copy and paste the table or go to Insert > Blank Page to add another sheet. You can also set the number of badges per sheet in the label setup.
Method 2 Using a Manual Table
-
Open a new Word document and go to the Layout tab. Set Margins to Narrow to maximise space.
-
Go to Insert > Table and create a two by two table for four A7 badges on an A4 page or a two by one table for two A6 badges.
-
Right click on the table and select Table Properties.
-
In the Row tab, check Specify height and set it to A7 is ten point five centimetres or A6 is fourteen point eight centimetres.
-
In the Column tab, check Preferred width and set it to A7 is seven point five centimetres or A6 is ten point five centimetres.
-
You are all set.
🚀 Pro tip Save your Word name badge template for future events. You have just saved your future self a lot of work.
Tired of the Template Tussle Already?
Let’s be honest, sometimes Word has a mind of its own. If you’d rather skip the setup and get straight to designing, we’ve got you covered.
Step 3: Design Like a Pro (Even If You’re Not)
Once your name badge template in Word is set up, you can experiment with fonts, logos and layouts. This is where a simple box becomes a brilliant badge. Focus on clarity and hierarchy because a badge has one purpose to help people connect.
The Anatomy of a Great Badge
First name
The hero
Make it big and bold. Use a clean font such as Arial, Helvetica or Calibri at a minimum of 38pt. It should be readable from across a room.
Last name
The sidekick
This can be smaller or sit on the same line. Around 28pt usually works well.
Job title and company
The context
This information is secondary. Use a smaller font around fourteen to eighteen points and place it below the name.
Logo and event details
The branding
Place your event or company logo at the top or bottom. Keep it subtle so it does not overpower the name.
QR code
Optional extra
A useful way to link to an agenda or a LinkedIn profile. Place it in a corner and make sure it is at least two centimetres square.
Main sponsor logo
The partner spotlight
If your event has a key sponsor, add their logo in a small, respectful position. Keep it subtle and place it low on the badge so it supports the design without stealing focus from the guest’s name.
Design rule of thumb If you have to squint it is too small. Print a test page, stick it on the wall and step back a couple of metres. If you cannot read the first name clearly adjust it in your Word template.
Need more tips See our full design guide for more inspiration.
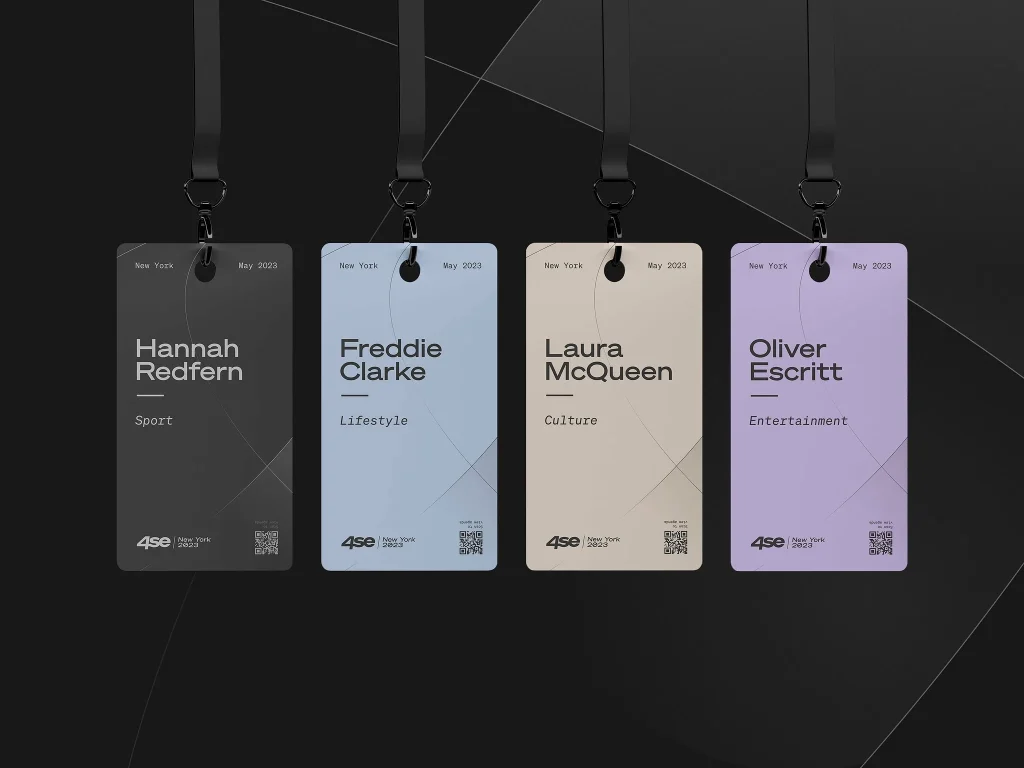
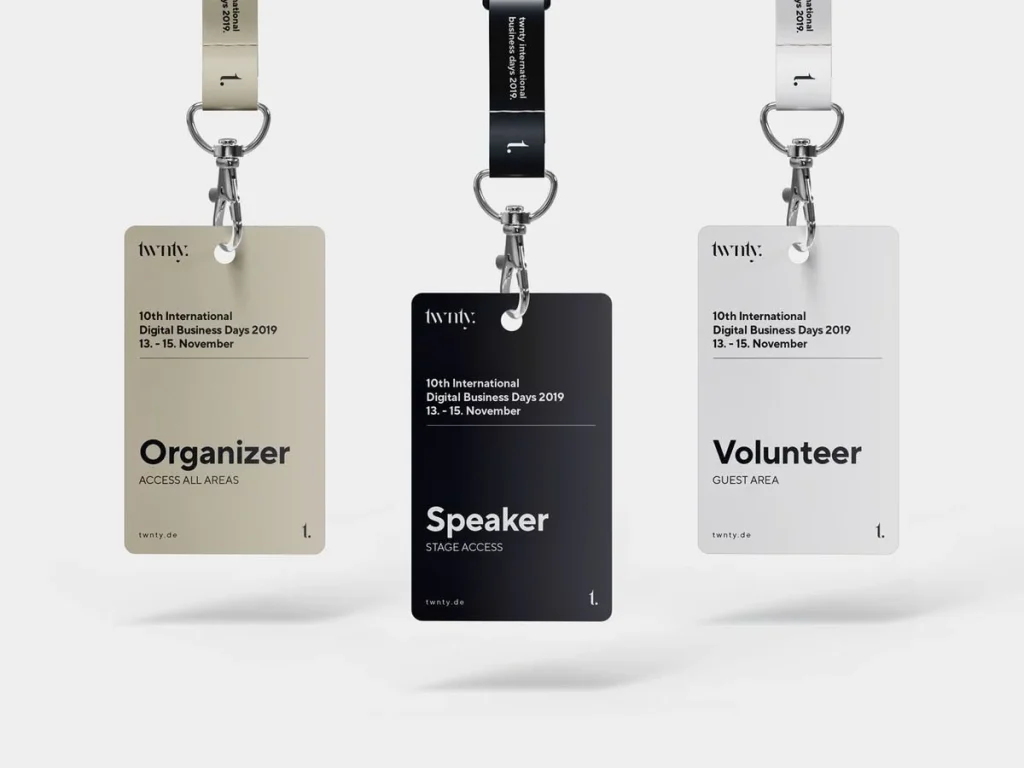
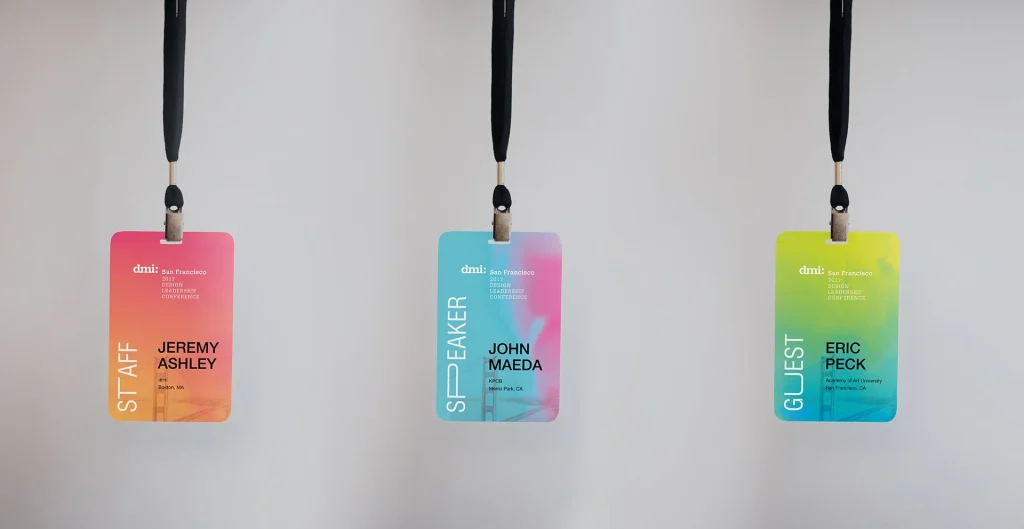
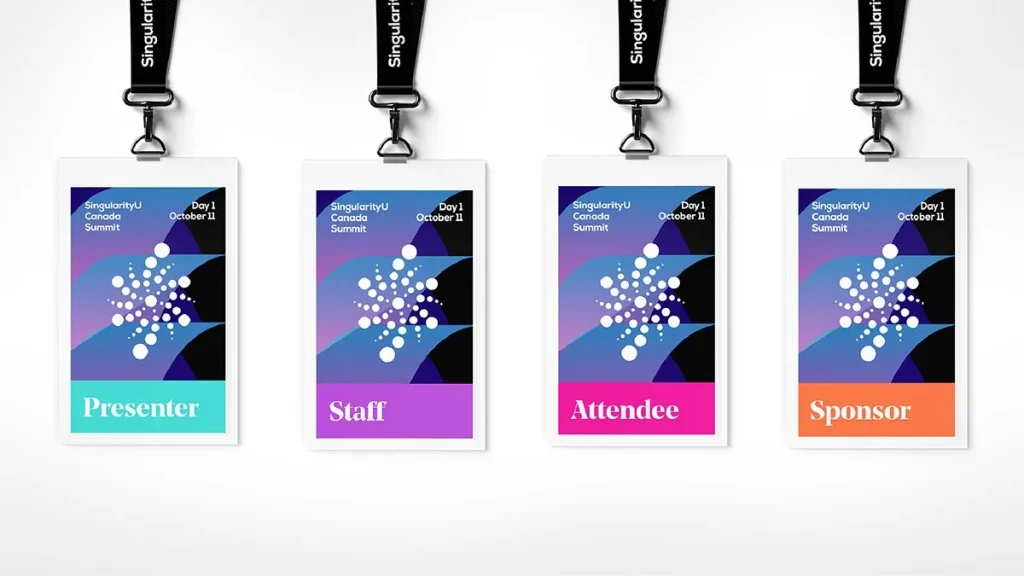
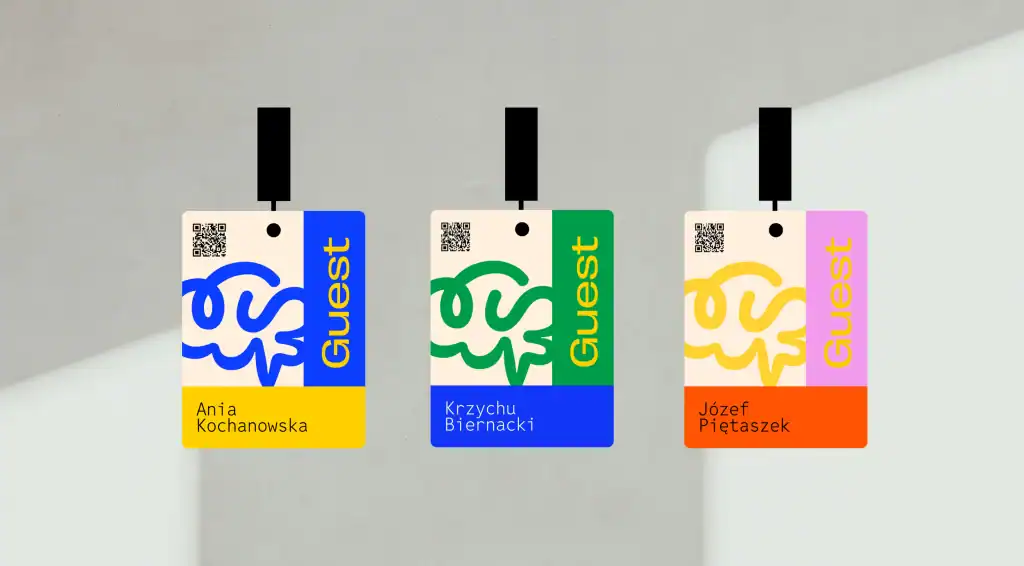
Design Inspiration: A Quick Look at Word-Designed Badges That Actually Look Great
Want to Skip the Guesswork?
We’ve distilled thousands of event badge designs into one simple checklist. Download it, print it, and keep it on your desk.
Step 4: The Mail Merge Lifesaver (For 10+ Guests)

If you have more than a handful of guests, creating a name badge template in Word will save you hours and spare you from typing every name manually. This method is the most reliable way to create name badges in Word without layout issues or manual formatting headaches.
-
Prepare Your List: Create a simple Excel spreadsheet with columns like FirstName, LastName, JobTitle, Company.
-
Start the Merge: In your Word badge template, go to Mailings > Start Mail Merge > Labels.
-
Select Recipients: Click Select Recipients > Use an Existing List… and choose your Excel file.
-
Insert Fields: Click in your first badge. Now use the Insert Merge Field button to place your fields (<<FirstName>>, <<LastName>>, etc.). Style them exactly how you want them to appear.
-
Update All Badges: Once the first badge looks perfect, click the Update Labels button. This will magically copy your design and fields to all the other badges on the page.
-
Preview & Finish: Click Preview Results to see how it looks with real names. When you’re happy, click Finish and Merge > Edit Individual Documents to generate a complete Word name badge template free of errors and ready to print.
💣 The Biggest Badge Mistakes We See (and How to Avoid Them)
After printing tens of thousands of conference badges, the same mistakes appear again and again. Here’s how to avoid them when creating a name badge template in Word.
-
Tiny guest names
If the first name isn’t readable, the badge is useless. Word templates often default to small text, but for events you need at least 36–38pt for the first name. Rule → If you cannot read it from two to three metres, it does not count. -
Over-designed badges
Design flair should never overshadow the name. Full-colour floods, textured backgrounds and heavy graphics make badges impossible to read in a crowd. Rule → Keep it clean. White or soft neutral background with a simple header or footer wins every time. -
QR codes too small
A QR code that does not scan creates awkward moments at registration desks. Minimum size → 2–2.5 cm square. Rule → Always test-scan on your phone before printing. -
Back of badge overload
People do not flip badges during events. Pages of text, agendas or note-taking sections will not be used. Rule → Keep it simple: sponsor logo, QR code or disposal instructions only. -
Designing too close to the edges
Logos and names placed near the edge often get trimmed or look visually cramped. Rule → Maintain a 7–10 mm safe zone inside the badge. -
Wrong paper thickness
Standard printer paper is too flimsy and bends during events. Rule → Use 200–300gsm cardstock or premium seed paper for crisp, professional badges.
Step 5: The Pre-Flight Check (Printing & Cutting)
You are almost there. A great design deserves a great print job. Here is how to avoid common printing pitfalls.
Your Print-Perfect Checklist
-
Paper matters: Use a sturdy 200 to 300gsm cardstock for a premium feel. Standard office paper is too flimsy.
-
Test print first: Always print a single page on plain paper to check for alignment issues or errors before printing your full batch.
-
Check printer settings: Ensure your printer is set to the correct paper size and high-quality printing.
-
Use a guillotine: For clean, professional edges, use a paper guillotine or craft cutter. It is much cleaner than scissors and avoids the dreaded wonky edge.
-
Have spares ready: Print five to ten per cent extra blank badges. You will thank yourself when last-minute guests arrive.
Troubleshooting Guide for Word Badges
Even when your name badge template in Word is set up correctly, Word has a mind of its own. Here are the most common issues (and quick fixes) so you can avoid last-minute stress before printing.
| Issue | Cause | Quick Fix |
|---|---|---|
| Text keeps jumping or shifting | Word auto-adjusts table cells | Right-click table → Table Properties → Untick “Automatically resize to fit contents” |
| Template prints off-centre | Printer margins overriding Word layout | Set printer to A4 → “Actual Size” or “100 percent” → turn OFF “Fit to Page” |
| QR code won’t scan | Too small or low contrast | Ensure 2–2.5 cm size → use black on white → test with your phone before printing |
| Borders or colours look blurry | Low-resolution images | Use high-res PNG or SVG for logos → avoid screenshots inside Word |
| My A6/A7 size keeps reverting | Word converting mm↔cm | Re-open Label Setup → re-enter dimensions → save as a custom template |
| Table lines appear when printing | Borders set to “Automatic” | Select table → Borders → None → print test page |
| Name isn’t centred vertically | Cell alignment defaulting to top | Right-click cell → Cell Alignment → Middle Centre |
Still stuck? Try saving your badge as a PDF before printing. It locks the layout so your design prints exactly as intended.
Step 6: Plan for Reality (The Pro Moves)
A great badge goes beyond design. It considers the human experience and the planet.
-
The lanyard test: Where will the lanyard clip or holes go. Make sure they do not punch through a name or logo. Our template shows a safe zone.
-
Think about the after party for your badges: Most badges end up in the bin. By using paper or cardstock and avoiding plastic lamination and holders, you have already created a recyclable badge.
-
Go truly green: For your next event, consider badges that leave no trace. Pair your design with a biodegradable lanyard and plantable seed paper for a memorable and genuinely sustainable experience.
Loved the Free Template and Instructions? Imagine the Full Service.
You’ve just saved time and stress creating a name badge template in Word. When you’re ready to make your next event even easier and more sustainable, let us handle the badges for you. Get an instant no-obligation quote in 10 seconds from our product page – you can email it to yourself.
Your Questions, Answered (FAQ)
Q: How do I create a name badge template in Word from scratch?
A: The fastest way is to use Word’s Labels tool. Go to Mailings > Labels > New Label and enter your badge dimensions. Word will generate a table layout you can customise with colours, logos and merge fields. This becomes your name badge template in Word.
Q: Is there a Word name badge template free that I can download?
A: Yes. We provide an A6 and A7 Word name badge template free to download. It includes safe zones, merge fields and a clean layout so you can start designing straight away.
Q: How do I handle last-minute guest list changes?
A: This is why spares are essential. Keep a few blank badges and a good marker handy. If you’re using Mail Merge, simply add new names to your Excel file and merge a single updated page into your name badge template in Word.
Q: What’s the best font size for readability?
A: For first names, aim for at least 38pt. Other text such as surnames, titles and company names usually works well between 12pt and 28pt. The rule of thumb is simple: readable from two to three metres away.
Q: Can I put QR codes on the badges?
A: Absolutely. QR codes are perfect for schedules, links or contact info. Make sure they’re at least 2cm square and placed on a clean, high-contrast background so they scan reliably.
Q: How do I print double-sided badges in Word?
A: Create a two-page name badge template in Word. Page 1 is the front, Page 2 is the back. Print all Page 1s, reinsert your pages, then print Page 2s. Many newer printers also offer automatic double-sided printing.